Address 304 North Cardinal St. Dorchester Center, MA 02124
Work Hours Monday to Friday: 7AM - 7PM Weekend: 10AM - 5PM
Plugin Setup and Data Reading (R – Read)
The first step was setting up the custom plugin environment and ensuring the data could be read and displayed on the frontend.
Plugin Files: The image below confirms the presence of the custom plugin zip file, containing the essential PHP file and a JavaScript folder, indicating that the foundational development work for the plugin was completed and packaged. (Image Here: Custom plugin uploaded in google classroom.png – showing student_database_plugin.zip contents)
Initial Data Read (R): The main output page, titled “External Product List,” demonstrates the successful Read operation. It connects to an external or custom database and pulls the data, displaying it in a structured table on the frontend of the WordPress site. (Image Here: External Product List.jpg – showing a table listing “Laptop Pro 15,” “Wireless Mouse,” etc., under “Product Name” and “Stock”)
Demonstrating CRUD Functions
The core requirement is to show the four main operations of the plugin in action. The screenshots below capture the state changes after each operation, specifically using the Student Database context.
1. Create (C)
This function allows a new record to be added to the database.
Demonstration: An “Add New Student” form is visible. After submitting the new student’s Name, Email, and Course, the entry appears in the “Student List” table below, confirming the creation process works.
2. Read (R)
This function retrieves and displays the records.
Demonstration: The “Student List” table successfully displays the record(s) currently in the database, showing the ID, Name, Email, Course, and Actions (Edit/Delete). The visibility of the newly created entry and the overall list confirms the Read operation is successful.
3. Update (U)
This function modifies an existing record’s details.
Demonstration (Implied): While a screenshot of the update form being edited is not provided, the “Edit” button next to the student entry (“Golo, Lea Mae P.”) shows the feature is implemented and available. Clicking “Edit” would take the user to a form pre-filled with the current data, allowing for modification.
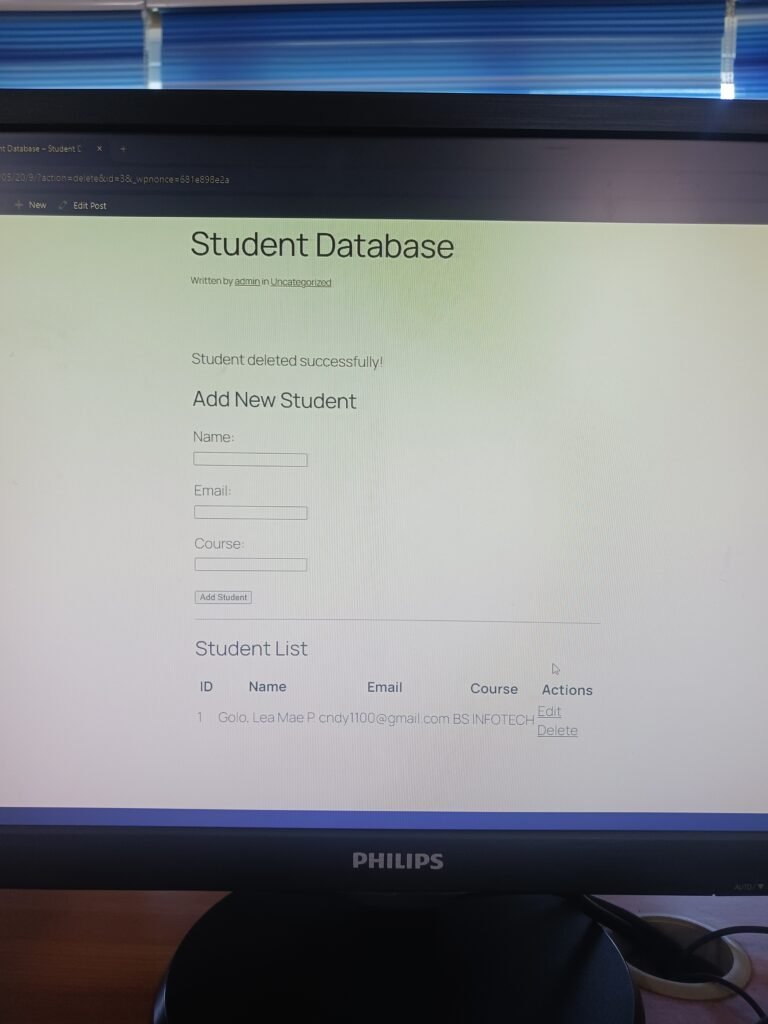
4. Delete (D)
This function permanently removes a record from the database.
Demonstration: The provided image confirms the final step of the lifecycle. The message “Student Deleted successfully!” is visible. Critically, the “Student List” below the message only shows one remaining entry (ID 1), or in the case of the image, the table has been refreshed/reloaded to reflect the deletion, confirming the successful permanent removal of a record from the database.
Note: The primary visible entry is shown with “Edit” and “Delete” actions available.
What I Learned
Building a CRUD plugin provided profound insight into full-stack web development within WordPress:
Database Interaction (PHP/SQL): I learned how to use PHP to interact with the WordPress database (or a custom database), including writing and executing SQL queries for INSERT (Create), SELECT (Read), UPDATE (Update), and DELETE (Delete) operations.
Backend Logic and Frontend Interface: This required integrating the backend data logic with the frontend user interface (HTML forms and tables) to ensure a seamless flow of data in and out of the system.
Custom Plugin Development: I gained direct experience in structuring a custom WordPress plugin, managing PHP files, incorporating shortcodes to display content ([student_database_list]), and understanding the execution pipeline within the WordPress CMS.